
What are tags on Squarespace and how to add categories

In this blog post we will be talking about when to, and the method of adding tags on Squarespace and how to add categories, as well as the difference between the two. You will want to use tags and categories at some point on your website, regardless of the industry or business that you’re in.
What is the Purpose?
The purpose of applying tags and categories is to organise your various content into a structured layout, which means your users won’t spend a lifetime sifting through your blogs, products or portfolio, when in search of a specific topic/item.
It also shows your clients and customers that you have taken some time to arrange your content in a user friendly way.

Tags on Squarespace

Add categories on Squarespace
Squarespace really does make it easy and straightforward for you to organise your content, and soon we’ll go through an example of how to do this with blog posts.
Tags and categories are not an essential part of Squarespace website design, but it is something you should do as absolute best practice.
What is the Difference Between Tags and Categories?
Category
This is the main (or general) topic(s) of whatever it is that you’re categorising. For example if you’re a photographer and have two or three areas of photography within your business, it would be a good idea to categorise them.
Example categories for a photography scenario: Landscapes, Animals, Portraits.
Ideally, you want to keep this to a maximum of 4 categories.
Tag
If your client is looking for a more specific item within your content, and going back to the photography example. They may want to see photos published on a certain date or within a more specific keyword (or tag). So, a further narrowing down could be:
Example tags for the above photography scenario, for the Landscape category: Coastal, 2020, January 2020.
You can really go specific with your tags/keywords, and you can have more than 4 tags per item that you’re tagging.
Remember - tags are case sensitive, so make sure you’re aware of this when you start using them, otherwise it won’t pick it up later (you’ll know what we mean soon).
Tags and categories are also a great way for letting Google know what your content is about, and may help with your search engine rankings.

How to Add Tags and Categories on Squarespace?
We will use blog posts as an example, from Squarespace version 7.0, to show you where you can find this option to add tags and categories.

Add your Tags and Categories at the bottom of Content tab.
When you go to edit your blog post, at the bottom of the Content tab, you will see the option to ‘+’ your Tags and Categories.
Any new tags and categories you create (remember, that tags are case sensitive) will come up as an option later, when you want to use them to organise your content.
When you then go to arrange future blog posts (or whatever content you’re organising), the tags and categories will auto populate (as Squarespace will remember them) and you will be able to just click the one you need.
To delete any previously created tags or categories, again head into ‘Edit’ your blog post and under the same ‘Contents’ tab, there is an option to delete by clicking the ‘x’ next to the tag/category.
Changed your Mind?
If you decide that you don’t want a tag or category anymore and want to replace it with another, you can do so easily within the ‘Settings’ section.

Tags and Categories; Gear icon for settings
For example, on the Blog page click the gear icon, or on ‘Settings’.

Tags and Categories; Blog Settings > Advanced tab
Note: The changes made will be across the board wherever the categories or tags are used.
Go into the ‘Advanced’ section and you can head into ‘Manage Categories’ or ‘Manage Tags’. Whichever you need to change.
On Categories, you can click on any one of them and edit or delete them. Similarly on Tags, you can delete or add to them.
How to Arrange your Site Content
There are a number of ways to do this, and it depends on how you want to structure your content page.
Let's go back to the Blog example again.
Creating the Content Page
Index Page
If you have a long list of content (e.g. blogs) which you need to create and publish (or plan to), an Index page is a great option for display. The problem with the Blog page is that you can only display the 20 most recent posts. An Index page is basically numerous pages or sections, which have been stacked on top of eachother. Together this accumulated content creates a long scrolling page.
Each section can be designed differently, and the sections are easy to move to different positions (move up or further down the page) if needed by a simple drag and drop.

Adding Index page on Squarespace
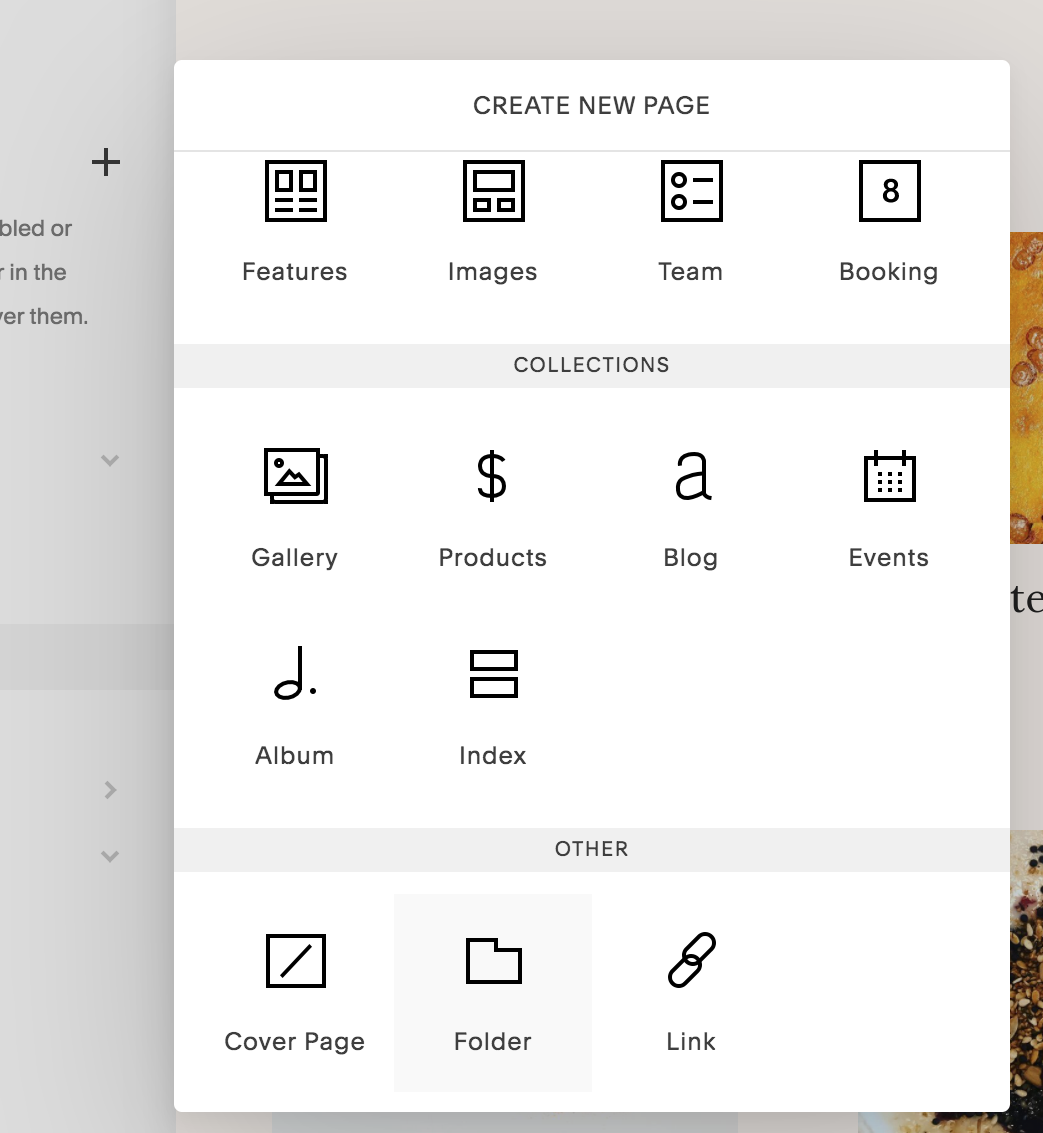
Go to ‘Pages’, and click the ‘+’ (add) button next to the Primary Navigation which is going to give you a new page. Head down to under the Collections section, and click ‘Index’ to create a new Index page.
Here is an example of an Index page for blog posts, organised by the year in the tags. This is shown by the 4th image below.

Index page on Squarespace

Tags on Squarespace

Tags on Squarespace

Tags on Squarespace
Summary Block
Now you have your page created, you have the option of naming it by clicking the little gear icon to the right.
Now, it's time to start adding the sections. Click the ‘Add Section’ button underneath, and select the ‘Blank’ page option.
So now you have your blank canvas to start designing with your content, with the ‘Summary’ blocks (check out our blog post on Squarespace Content Blocks).
Chances are that you already have some blog content published that you’re looking to re-organise. This is probably sitting on a page ready to be pulled over. The Summary blocks will help you in doing this.

Summary block on Squarespace
To add the Summary blocks, you will need to ‘Edit’ the new page, and find the teardrop insert point, or, on the right hand side you will have the option to click the ‘+’ button which will do the same thing.

Grid layout on Squarespace
Head down to the ‘Summary’ blocks. It is completely up to you which type of layout you want, but the Grid layout is a nice option to go for in terms of its simplicity.
This is an example of a Grid layout for Blog posts from the Original Box blog page.

Grid layout on Squarespace - Summary block
Organise Content
Content
You need to let the Summary block know which content you need pulling over. You need to select the correct page you need from the Content tab (e.g. if you have a page with your published Blog posts).

Summary block; Selecting the right page, from the list of Content
Layout
Don’t worry, if you don’t like the layout that you have initially chosen, you can always change this later. You can also change the sizing of the thumbnails and spacing between them.
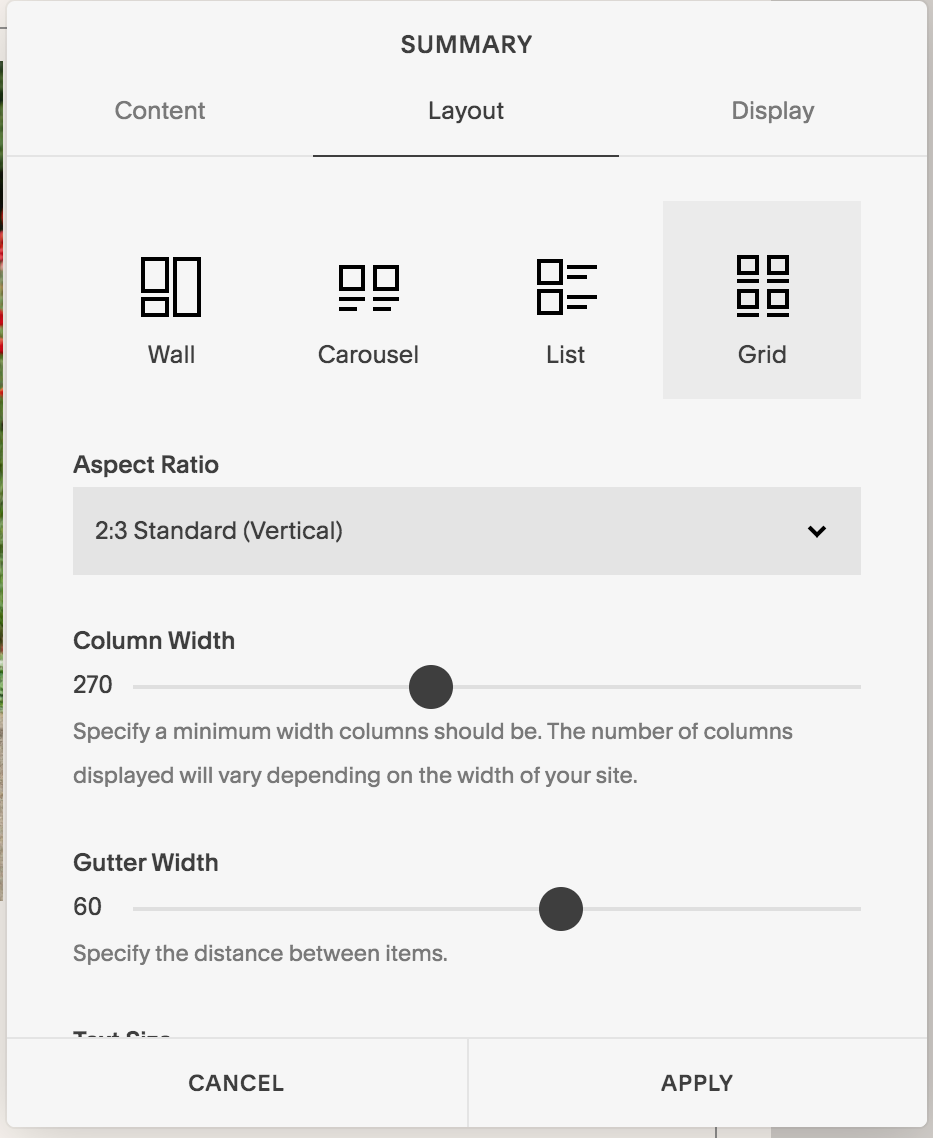
Summary block; Layout options
Display
This is the tab you want, in order to tell your Summary block which content is to be displayed. You can tell the block the number of items you want displayed, and what needs to be displayed (thumbnail, excerpt, etc). You can also decide whether or not to include Metadata under your thumbnails, which can display things like date posted, category, tags, etc.
This is where you decide whether to organise your content by Category or Tags, or both. Include the instruction into the relevant field to let Summary block know what posts you want showing up.
Then, in order to lay out all of your other (from other categories/tags) content into one long scrolling (Index) page, you will need to add a new section (Summary block) every time, depending on how you have decided to lay out your content (e.g. by month/year etc).

Summary block; Display options

Tags on Squarespace and adding Categories using Summary block
Primary Navigation
In minimal web design, we want to keep the pages within the primary navigation to a minimum. But another option to organise your content is to make drop down menus within this main navigation.
If you create drop down menus under your content (such as for Blog, Portfolio, etc), this can provide a good way for your users to find the content that they need, quicker, whilst also keeping your main navigation tidy. These drop down menus will show up when your user hovers above them.
Folder page on Squarespace
Head into ‘Pages’ and click the ‘+’ sign as if you were adding a new page. However this time you will choose ‘Folder’ and name it what you need it to be (e.g. Blog for blog posts; choose the little gear icon to do this).
Please note: first you want to do this under the ‘Not Linked’ (to keep it away from the main navigation) section.
Take the following steps:
Add the Folder
Click ‘Add Page’ button, and add a blank page
On the blank page, create a Summary block (in the layout you want to use, as discussed before)
Design your particular layout and remember to name the page
Now for the important part; assign the Category or Tag that you want your content arranged by on this page
Repeat steps 2 - 5 for all of your required Categories or Tags
This will make sure that your drop down menu content is arranged under their relevant categories/tags, ready for you to use for the drop downs.
Next, you want to add a Folder under the Primary Navigation, because this is obviously where you want your drop down menu to be.
Folder page on Squarespace
Under the Folder, click the ‘Add Page’ button, and this time head to ‘Others’ to choose ‘Link’.
Name your Link Title and by choosing the little gear icon again, you can set the link to the content page you need.
When you select the gear icon, you need to go to ‘Page’, type in the name of your blog and it should auto-populate it (or scroll through your pages). This is the page which you created earlier in the ‘Not Linked’ section.
Below is an example for a link created to blog posts under a Food category.

Link editor on Squarespace; naming link title, and adding link

Selecting the link to Page

Adding categories; Food category drop down under Blog page
This should now present you with this particular category when you hover over your content in the main navigation.
For each category for your drop down, you need to add a new page with a new link.
